Archive for the ‘On Windows’ Category
Recycle Bin Restoration (Why do we delete it in the first place?)
I remember vividly, just a little under a year ago, when I attended an IT conference. Well, it’s called an IT conference, but really, it’s just a sales pitch by a Microsoft
representative introducing (after one-and-a-half-years) new features of Vista (I think that’s before SP1). The speaker was really funny and all, but it completely failed to deliver. I mean, it was so mundane as to teach people how to change folder views! If it was useful, I’d have thought it’d be good for a refresher. But, needless to say, it was quite disappointing. I was hoping that it’d introduce PowerShell and its functionalities, since there were confirmations that Microsoft would be releasing a better, enhanced and more powerful version of the command prompt for tech users, which never happened. But, really, anybody can use the command prompt, since the commands are so versatile and easy to learn.
However, what struck me as bizarre wasn’t the speaker or the content itself. It was the Q&A session that we have after each hour (the conference took place over the span of four weeks, and it had one three-hour session per week, if my memory serves me right). The speaker, who was called Ivan, would summarize the main questions asked in the session, and it was then that the funniest question of all was asked (by many people, mind you),
‘…how do you restore Recycle Bin?’
I was dumbstruck. Apparently, so was Ivan. I mean, why would you delete Recycle Bin in the first place?
The answer lies in a curious misnomer in the right-click options of Recycle Bin. There are only seven folder operations available in the right-click menu:
– Open
– Explore
– Empty Recycle Bin
– Create Shortcut
– Delete
– Rename
– Properties
…and many people (myself included) thought that ‘Delete’ would clear the contents of the Recycle Bin, when it was the ‘Empty Recycle Bin’ button that did the job. But of course, as soon as you hit ‘delete’, *WHAM*, it’s gone. (less the sound effects XD)
So, as silly as this’ll sound, I’m going to talk about how to restore Recycle Bin.
If you use Vista:
- Right-click on the Desktop (on a clear space)
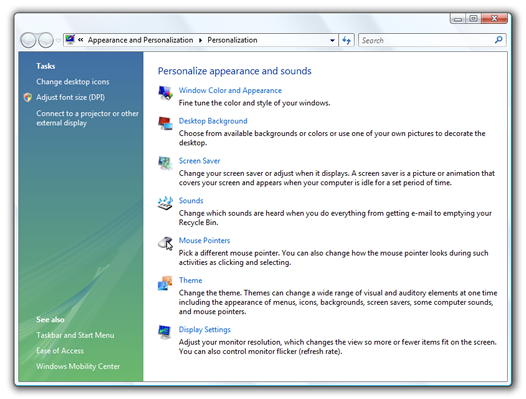
- Click Personalize
- Under the left hand corner, you’ll see a link that says ‘Change Desktop Icons’
- In the new window, check the ‘Recycle Bin’ box
- Click ‘OK’ and the icon will appear on your Desktop
If you use XP:
It’s much, much more complicated in XP. And for users that have never used the registry before, it’s generally not recommended. However, you can still give it a shot, if you feel confident with learning a few things today.
(Alternatively, there’s a program called Tweak UI that you can download to the same effect. It’s under a set of tools that Microsoft calls ‘Power Toys’ that extend the current capabilities of your PC. There’s one that allows you to manage multiple desktops, for instance, similar to the desktop rotating cube you get in Linux.)
Page: http://www.microsoft.com/windowsxp/downloads/powertoys/xppowertoys.mspx
Direct link: http://download.microsoft.com/download/f/c/a/fca6767b-9ed9-45a6-b352-839afb2a2679/TweakUiPowertoySetup.exe
Direct link 2: http://download.microsoft.com/download/f/c/a/fca6767b-9ed9-45a6-b352-839afb2a2679/TweakUIPowertoySetup_ia64.exe
To restore the icon using the registry…
…first, you MUST backup your registry. If you make any mistakes, and modify a different value, it could crash your PC, since the registry stores values for EVERYTHING that makes up a PC, including software, hardware, user settings, even the kernel. So here’s how you do it:
If you use Vista…
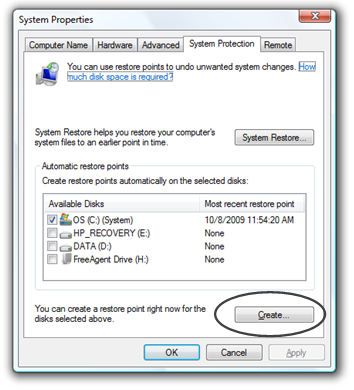
- Click start, and in the search box, type ‘systempropertiesprotection’
- A window that looks like this should open, in which you click ‘Create’
- Then, you simply type in a name which describes it, and click create.
Restoration
To restore your PC from your restore point, you simply click the ‘Restore point’ button above it, and the wizard will take you through the restoration process. (Remember, this restores ALL your files, not just your registry settings. I’ve never tried it out to see if it overwrites my current files, so you might want to back up the documents, media and other files you’ve got on your PC now.)
If you’re using XP…
- Go to Start –> Run, and type ‘%systemroot%\system32\restore\rstrui.exe
- Simply follow along the wizard, and it’ll take you through creating a restore point.

System Restore XP Image source: http://techsalsa.com/wp-content/uploads/2008/10/systemrestore.gif
I don’t use XP, so I just took a photo from the Internet~ XD
Restoration is from the same window, just above the create restore point option, and the wizard will take you through it similarly.
So, reverting to editing the registry setting, here’s how you do it on XP:
- Go to Start –> Run (Alternative key: Windows + R)
- Type in ‘regedit’
- Press ‘Enter’
- Locate this key: HKEY_CURRENT_USER\Software\Microsoft\Windows\CurrentVersion\Explorer\HideDesktopIcons\NewStartPanel
- In the window that’s besides the root structure, right-click this DWORD value: {645FF040-5081-101B-9F08-00AA002F954E}, and click ‘Modify’.
Note the little arrows beside each hive (like a folder), to see what’s in the folder, you have to click the little arrow beside it, which turns black.
- In the Value Data box, type 0. ‘1’ hides the icon, ‘0’ displays it.
Voila! Done.
Again, for technical savvy people, or even an average PC user, this post will be of little interest or may seem redundant, however, it does highlight an important feature of the Windows operating system: the registry.
To be honest, the instructions to restore the recycle bin came directly from the Microsoft support website, because I’m not really familiar with the registry as well myself. You can find the links here:
Restoring recycle bin: http://support.microsoft.com/kb/810869
Back up and restore registry: http://support.microsoft.com/kb/322756/
But, I think I’m going to do a bit of research on the registry, play around with it for a bit, and if I’ve discovered any useful properties of the registry, I’ll be sure to put up some posts about it. (For students, this will be very interesting – if you have the command prompt disabled at school, a line in a simple VB Script will help enable it, and you can very easily re-enable some of the access privileges set by your school. Not encouraging obliteration of the school system, of course. Just convenient access to files on the school server. XP)
I’d love to hear your thoughts! XD
Where do copied objects vanish off to?
Back when I was on Yahoo Answers, I saw a question that was very similar to this. Since I don’t have a photographic memory, I’m going to paraphrase it. It went something like, ‘I’ve copied many photos off the Internet, but I can only seem to paste the last item I’ve copied. How can I access the previously copied items?’ I was struck that this was a basic operation on all operating systems with a GUI, and yet I didn’t know it! Well, being the researcher that I am, I looked it up instantly.
Funny function, ‘Ctrl + C’ is. I remembered from Harry Potter when McGonagall was entering Ravenclaw’s common room, she was asked, ‘Where do vanished objects go?’, to which she replied, ‘Into non-being, which is to say, everything.’ While the arcane field of magic contradicts with the precise nature of computer science, the answer proves to be a good representation of what the clipboard is.
Simply put, the clipboard is a temporary, stack-based memory storage location, which, after you logout, will clear its contents. When you copy things from different places, our PCs seem to be able to magically access and transfer the copied data across completely different applications. But, as we now know, the copied data (copying is evoked, or called forth, by user input, which is linked to the programming interface, or the friendly screen we see, e.g. in Windows, Ctrl + C is copy because Microsoft defines it to be, not because it’s there by coincidence) is stored in a location in volatile (temporary) memory called the clipboard, which is accessed by applications through the defined user input (or Ctrl + C in Windows, Command + C in Mac).
However, a clipboard is stack-based. It means that every new item you copy in an operating system is stacked on top of the last item, replacing it. So, by default, most applications only allow one instance of a clip (the copied object) to be stored in the clipboard (the memory location).
This drawback is defined by some applications, in which software developers and programmers develop a clipboard manager, allowing for multiple instances of clips to be stored. For example, Microsoft Word allows up to 24 clips to be stored in the 2003 and 2007 versions.
To access the clip in the 2003 version, you can simply go to Edit à Office Clipboard to display the window. (If an icon that looks like ![]() is in the status bar, then it’s already on.)
is in the status bar, then it’s already on.)
To access the clipboard in the 2007 version, you can simply click on the clipboard button as seen below:
(Note: You have to click the tiny arrow beside it.)
And the clipboard will be shown:
For convenience, it’s easier to simply automatically have the clipboard pop-up every time you open Word. You can do this through clicking at the options button below, and checking the ‘Show Office Clipboard Automatically’ radio button.
In Vista, when you switch on Clipboard, a clipboard icon will appear in the status bar (at the bottom of your window). Double clicking it will open the clipboard window in the active Office application (i.e. Word, Excel, Access, Powerpoint, Groove, OneNote, etc., whichever you’ve got on top).
But, note that clipboard can only be used in the Office suite. You can’t use it for applications such as Photoshop or Fireworks.
(Obviously, the ‘trick’ is to open a Word window all times, so you can have the clipboard manager open to use. You paste it once, and copy and paste it again in your other application.)
Hope you found this useful! (Sorry, techies, this is for newbies like myself, but check out the programming sub-category in computer section, I’ll be doing some more articles when I get more proficient in programming! XD)
Share your thoughts on this post!! XD


